So you’ve spent hours and hours stitching up your masterpiece – finally, whoopee, you’ve now stitched your last stitch. You take if off the frame and notice that instead of a nice neat square, you now have something a bit lopsided. This is because, with tent stitch, you are always working in the same direction which distorts the canvas. So now what?
You can send off your canvas to your nearest embroidery shop and get it professionally blocked and magicked into a cushion – it ain’t cheap but these guys know what they are doing! However if you want to save yourself some dollars and have a crack yourself…. Here is how to go about it.
You will need:
A big piece of really clean board - ply is good – don’t use anything like mdf which will crumble when it gets wet. You also don’t want anything that will bleed into your precious canvas. (If you are worried about this, cover it in plastic wrap first).
A hammer and tacks or a staple gun. I prefer the hammer option as I find the staples a bit hard to get out whereas the tacks are easy to remove if you need to reposition them.
A clean spray bottle of water
Measuring tape
Patience
Wallpaper paste
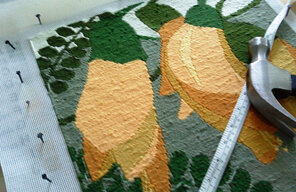
Give your canvas a good spray with the water – you don’t want it soaking, just very damp. (Of course you have already checked that the wool you have used is colour fast!) The water will soften the sizing in the canvas allowing you to stretch it back into shape. Place your canvas right side down on the board.
Get your hammer and bang in a tack in the centre of one side, then the opposite side about 2 to 3 cms away from the stitching. Then put a tack into the centre top, then centre bottom. Now start on the corners. Hammer in tacks at 2 to 3 cm intervals all the way around, stretching as you go. Constantly use your measuring tape to make sure the distance from the edge of the board to the edge of your stitching is the same at the top corner and bottom corner of the canvas. Also measure diagonally from top left to bottom right and vice versa - these should be exactly the same You want to end up with a canvas that is as square as you can get it which will make your cushion-making easier.
Mix up some wall paper paste with water - you can buy it in small packets from hardware stores. You want about 1 cup of gooey mixture - not stiff or too runny, about the texture of yoghurt. Smear this evenly over the back of your canvas - I find it's best to do this with your fingers for an even, all-over coverage. I know this sounds peculiar but it really helps to keep the shape of your canvas nice and square. Don't worry, the paste won't mark or stain your precious needlepoint!
Leave it to dry for a few days (24 hours in summer). Don’t be tempted to get the hairdryer out! Then take it off your board and head over to the sewing machine. Cushion making instructions are here.
Good luck!!